Discord Webhookを利用した通知
このページでは、Discord Webhookを利用した通知の設定方法について説明します。
Discord Webhookの概要
1. Discord Webhookとは
Discord Webhookは、外部サービスからDiscordのチャンネルにメッセージを送信するための機能です。
こんな感じのやつです
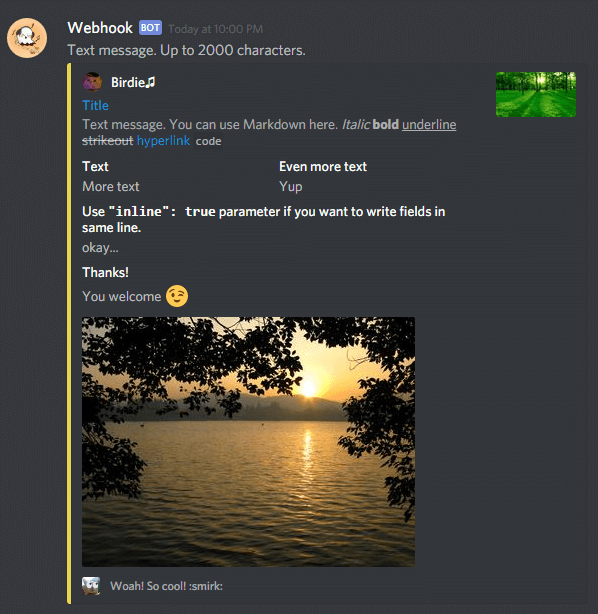
引用: birdie0/discord-webhooks-guide
2. Discord Webhookの仕組み
Discord Webhookは、webhook URLを利用してメッセージを送信します。
webhook URLは、通知を送信するためのアドレスのようなものです。 通知を送信する際には、このwebhook URLにjsonという形式でメッセージを送信します。
{
  "content": "Hello, World!"
}
上記のようなjsonをwebhook URLに送信すると、Discordのチャンネルに「Hello, World!」というメッセージが送信されます。
3. Discord Webhookの作成
まずは、通知を送信するためのWebhook urlを作成します。
- 通知を送信したいチャンネルを右クリックし、「チャンネル設定/Edit Channel」を選択します。
- 「Integrations」を選択し、「Webhooks」をクリックします。
- 「Webhookを作成/New webhook」をクリックします。
- Webhookの名前を入力し、「保存/Save Changes」をクリックします。
- Copyボタンをクリックして、Webhook URLをコピーします。
- これで、Webhookの作成は完了です。
Webhookの実装
pluginにおいてDiscord Webhookを利用した通知を実装する方法について説明します。
今回は、プレイヤーがサーバーに参加した際にDiscordに通知を送信するプラグインを作成します。
1. プラグインの作成
まず、プラグインを作成します。プラグインの作成方法については、以前の資料を参照してください。
2. Discord Webhookの設定
プラグインの設定ファイルに、Discord WebhookのURLを記述します。
discord:
  webhook_url: "https://discord.com/api/webhooks/1234567890/ABCDEFGHIJKLMN"
3. プラグインの実装
プラグインの実装を行います。
package com.github.<username>.testWebhook;

import com.github.<username>.testWebhook.listener.PlayerJoinListener;
import org.bukkit.plugin.java.JavaPlugin;

public final class TestWebhook extends JavaPlugin {
    static TestWebhook plugin;

    @Override
    public void onEnable() {
        // Plugin startup logic
        plugin = this;
        getServer().getPluginManager().registerEvents(new PlayerJoinListener(),this);
        saveDefaultConfig();
    }

    @Override
    public void onDisable() {
        // Plugin shutdown logic
    }

    public static TestWebhook getPlugin() {
        return plugin;
    }
}
package com.github.<username>.testWebhook.listener;

import com.github.<username>.testWebhook.TestWebhook;
import org.bukkit.entity.Player;
import org.bukkit.event.EventHandler;
import org.bukkit.event.Listener;
import org.bukkit.event.player.PlayerJoinEvent;

import java.io.OutputStream;
import java.net.HttpURLConnection;
import java.net.URI;
import java.net.URL;
import java.nio.charset.StandardCharsets;

public class PlayerJoinListener implements Listener {
    @EventHandler
    public void onPlayerJoin(PlayerJoinEvent event) {
        Player player = event.getPlayer();
        String playerName = player.getName();
        String message = playerName + " joined the server!";
        sendWebhook(message);

    }

    public void sendWebhook(String message) {
        ...
    }
}
public void sendWebhook(String message) {
    String url = TestWebhook.getPlugin().getConfig().getString("discord.webhook");
    try {
        assert url != null;
        URL webhookUrl = URI.create(url).toURL();
        HttpURLConnection connection = (HttpURLConnection) webhookUrl.openConnection();
        connection.setRequestMethod("POST");
        connection.setRequestProperty("Content-Type", "application/json");
        connection.setDoOutput(true);

        String jsonPayload = "{\"content\": \"" + message + "\"}";
        try (OutputStream os = connection.getOutputStream()) {
            byte[] input = jsonPayload.getBytes(StandardCharsets.UTF_8);
            os.write(input, 0, input.length);
        }

        int responseCode = connection.getResponseCode();
        if (responseCode != 204) {
            // Handle error
            TestWebhook.getPlugin().getLogger.info("Webhook failed with response code: " + responseCode);
        }
    } catch (Exception e) {
        e.printStackTrace();
    }
}
まとめ
このページでは、Discord Webhookを利用した通知の設定方法と、プラグインにおいてDiscord Webhookを利用した通知を実装する方法について説明しました。 一番初めに紹介した画像などについては、Discord webhookのembed機能を利用して実装することで、より豪華な通知を送信することができます。
詳細な実装方法については、公式ドキュメントを参照してください。